wsgiref 源代码分析
wsgiref
wsgiref 是Python标准库给出的 WSGI 的参考实现。
WSGI是Python Web 开发中为服务器程序和应用程序设定的标准,满足这一标准的服务器程序和应用程序可以配合使用。我在上一篇博文《WSGI简介》中对此有详细的介绍。在阅读wsgiref源代码之前,一定要对WSGI有一定了解。
WSGI 在 PEP 333 中描述,但是只靠阅读PEP 333 可能在理解上还是不够深入,所以阅读官方给出的参考实现是很有必要的。阅读完这份源代码后,不仅有利于对WSGI的理解。而且会让你对服务端程序如何对客户端请求有一个直观的理解,从相对底层的socket监听请求,到上层对HTTP请求的处理。
当然,这只是对WSGI的参考实现,目的是为了描述清楚WSGI,而不是真正用在产品中。如果想对Python Web开发中服务器端的实现有更广泛,更深入的理解,需要进一步阅读Python常用框架的源代码。
wsgiref 源代码分析
wsgiref 源代码可以在 pypi wsgiref 0.1.2 下载。另外,我在阅读的过程中作了大量注释,包含模块介绍,调用层次关系,demo的运行结果,等 等,还包含了阅读过程中制作的思维导图。GitHub地址注释版wsgiref。
结构
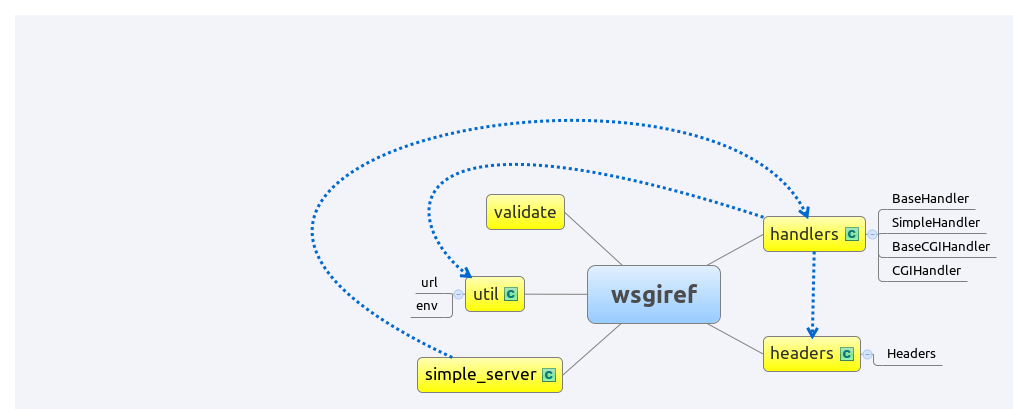
上图描述了wsgiref的所有模块及模块间的调用关系,可以看出,wsgiref有以下模块:
-
simple_server
这一模块实现了一个简单的 HTTP 服务器,并给出了一个简单的 demo,运行:python simple_server.py
会启动这个demo,运行一次请求,并把这次请求中涉及到的环境变量在浏览器中显示出来。
- handlers
simple_server模块将HTTP服务器分成了 Server 部分和Handler部分,前者负责接收请求,后者负责具体的处理, 其中Handler部分主要在handlers中实现。 - headers
这一模块主要是为HTTP协议中header部分建立数据结构。 - util
这一模块包含了一些工具函数,主要用于对环境变量,URL的处理。 - validate
这一模块提供了一个验证工具,可以用于验证你的实现是否符合WSGI标准。
simple_server
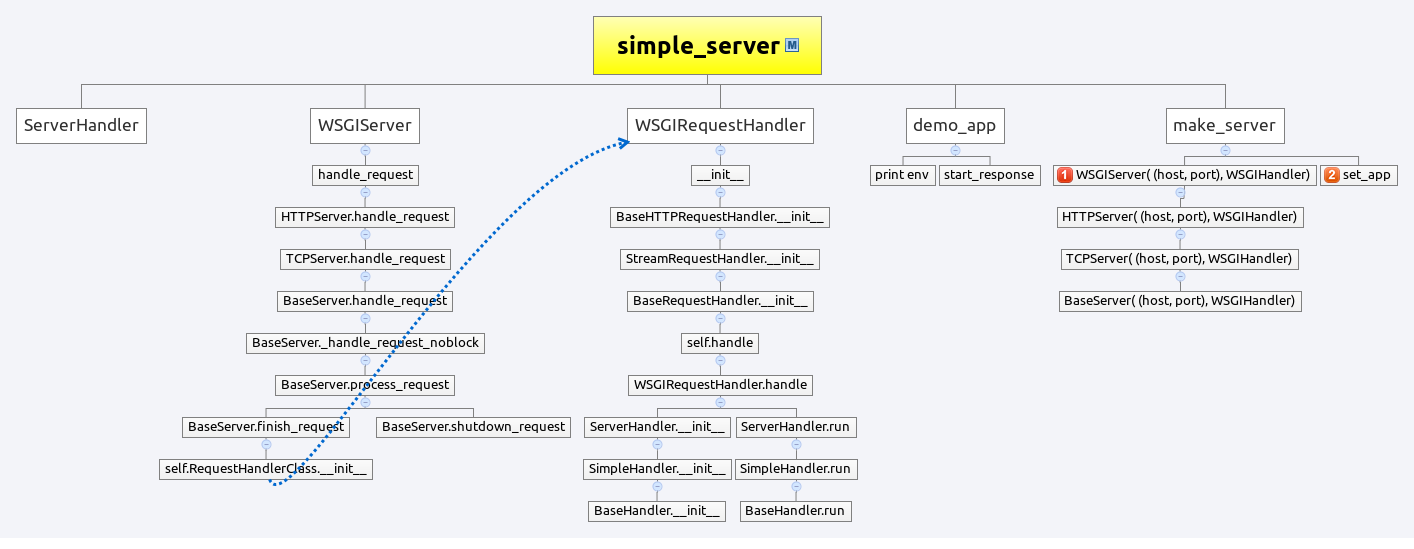
可以看出,simple_server 模块主要有两部分内容
- 应用程序
函数demo_app是应用程序部分 - 服务器程序
服务器程序主要分成Server 和 Handler两部分,另外还有一个函数 make_server 用来生成一个服务器实例
我们先看应用程序部分。
注意:以 M:开始的都是我自己添加的注释,不包含在最初的源代码中。
def demo_app(environ,start_response):
    # M: StringIO reads and writes a string buffer (also known as memory files).

    from StringIO import StringIO
    stdout = StringIO()
    print >> stdout, "Hello world!"
    print >> stdout

    h = environ.items()
    h.sort()
    for k,v in h:
        print >> stdout, k,'=',`v`

    start_response("200 OK", [('Content-Type','text/plain')])

    return [stdout.getvalue()]
这里可以看出,这个 demo_app 是如何展示WSGI中对应用程序的要求的:
- demo_app 有两个参数
- 第一个参数 environ是一个字典
- 第二个参数 start_response是一个可调用函数
- demo_app 返回一个可迭代对象
- demo_app 需要调用 start_response
另外,可以看出,返回的内容就是环境变量当前的内容,这一点可以运行
python simple_server.py
在浏览器中看到的内容,就是上述源代码的for循环中输出的。
这里,使用了 StringIO ,可以看出,所有输出的内容都先存储在其实例中,最后返回的时候一起在可迭代对象中返回。
接下来,我们看服务器程序。
先从 make_server 看起,它是用来生成一个server实例的:
def make_server(
    host, port, app, server_class=WSGIServer, handler_class=WSGIRequestHandler
):
    """Create a new WSGI server listening on `host` and `port` for `app`"""

    # M: -> HTTPServer.__init__
    #    -> TCPServer.__init__
    #       -> TCPServer.server_bind
    #           -> TCPServer.socket.bind
    #       -> TCPServer.server_activate
    #           -> TCPServer.socket.listen
    server = server_class((host, port), handler_class)

    # M: conresponding to WSGIRequestHandler.handle()
    #    -> handler.run(self.server.get_app())
    server.set_app(app)

    return server
虽然代码只有三行,但是可以看出生成一个 server 都需要些什么:
- (host, port)
主机名和端口号 - handler_class
用于处理请求的handler类 - app
服务器程序在处理时,一定会调用我们之前写好的应用程序,这样他们才能配合起来为客户端面服务,所以,你看到了那个
set_app调用。
另外,在注释部分,你可以看到那代码背后都发生了什么。
生成 server 实例时,默认的 server_class 是 WSGIServer,它是HTTPServer的子类,后者又是TCPServer的子类,所以初始化 server 时,会沿着类的继承关系执行下去,最终,生成 server 实例的过程,其实是最底层的 TCPServer 在初始化时,完成了对socket的bind和listen。
后面的 set_app 设置了 app,它会在 handler_class (默认为WSGIRequestHandler)的handle函数中被取出来,然后交给 handler 的 run 函数运行。
好,现在我们开始介绍Server部分的主要内容,即WSGIServer和WSGIRequestHandler,首先,我们看一下二者的继承体系。
- WSGIServer
# M:
#         +------------+
#         | BaseServer |
#         +------------+
#               |
#               V
#         +------------+
#         | TCPServer  |
#         +------------+
#               |
#               V
#         +------------+
#         | HTTPServer |
#         +------------+
#               |
#               V
#         +------------+
#         | WSGIServer |
#         +------------+
可以看出 WSGIServer 来自 HTTPServer,后者来自 Python 标准库中的BaseHTTPServer模块,更上层的TCPServer和BaseServer来自 Python 标准库中的 SocketServer 模块。
- WSGIRequestHandler
# M:
#         +--------------------+
#         | BaseRequestHandler |
#         +--------------------+
#                   |
#                   V
#         +-----------------------+
#         | StreamRequestHandler  |
#         +-----------------------+
#                   |
#                   V
#         +------------------------+
#         | BaseHTTPRequestHandler |
#         +------------------------+
#                   |
#                   V
#         +--------------------+
#         | WSGIRequestHandler |
#         +--------------------+
可以看出 WSGIRequestHandler 来自 BaseHTTPRequestHandler,后者来自 Python 标准库中的BaseHTTPServer模块,更上层的StreamRequestHandler和BaseRequestHandler来自 Python 标准库中的 SocketServer 模块。
这时候,三个模块之间的层次关系我们可以理清楚了。
# M:
#        +-----------------------------------------------+
#        | simple_server: WSGIServer, WSGIRequestHandler |
#        |                                               |
#        +-----------------------------------------------+
#                               |
#                               V
#       +----------------------------------------------------+
#       | BaseHTTPServer: HTTPServer, BaseHTTPRequestHandler |
#       +----------------------------------------------------+
#                               |
#                               V
#       +----------------------------------------------------+
#       | SocketServer: TCPServer,BaseSErver;                |
#       | StreamRequestHandler,BaseRequestHandler            |
#       +----------------------------------------------------+
#
另外,这一模块中还有一个类,叫ServerHandler,它继承自 handlers 模块中的 SimpleHandler,我们再看看它的继承体系:
# M:
#        +-------------+
#        | BaseHandler |
#        +-------------+
#               |
#               V
#       +----------------+
#       | SimpleHandler  |
#       +----------------+
#               |
#               V
#       +---------------+
#       | ServerHandler |
#       +---------------+
#
好了,现在这个模块中的继承结构都弄清楚了,现在我们看看他们如何配合起来完成对客户端请求的处理。
首先,回顾simple_server涉及的模块:
- WSGIServer
- WSGIRequestHandler
- ServerHandler
- demo_app
- make_server
然后,把大脑清空,想一下要对客户端请求进行处理需要做什么
- 启动服务器,监听客户端请求
- 请求来临,处理用户请求
我们看看这几个模块是如何配合完成这两个功能的
先看看 simple_server 模块的 main 部分,即执行
python simple_server.py
时执行的内容:
    httpd = make_server('', 8000, demo_app)
    sa = httpd.socket.getsockname()
    print "Serving HTTP on", sa[0], "port", sa[1], "..."

    # M: webbrowser provides a high-level interface to allow displaying Web-based documents
    # to users. Under most circumstances
    import webbrowser
    webbrowser.open('http://localhost:8000/xyz?abc')

    httpd.handle_request()  # serve one request, then exit
可以看出,主要完成的功能是:
- 启动服务器
- 模块用户请求
- 处理用户请求
那么,我们主要关心的就是 make_server 和 handle_request 背后都发生了什么。
- make_server
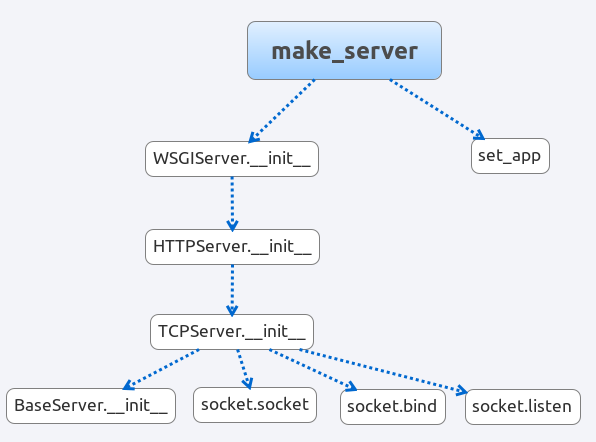
上图可以看出函数之间的调用关系,也可以看出 make_server 到 使用 socket 监听用户请求的过程。
- handle_request
handle_request 的过程真正将各个模块联系起来了。
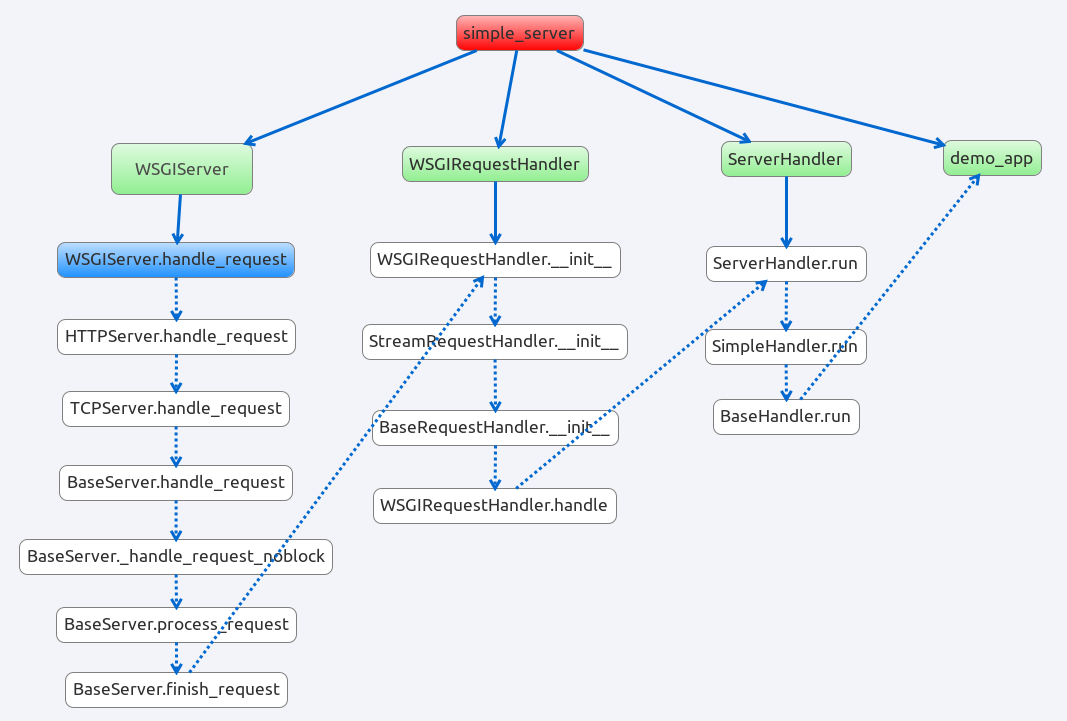
上图很清楚地说明了 由handle_request到demo_app的执行过程,把这个模块的各个部分联系起来。相信无需多言了。
handlers
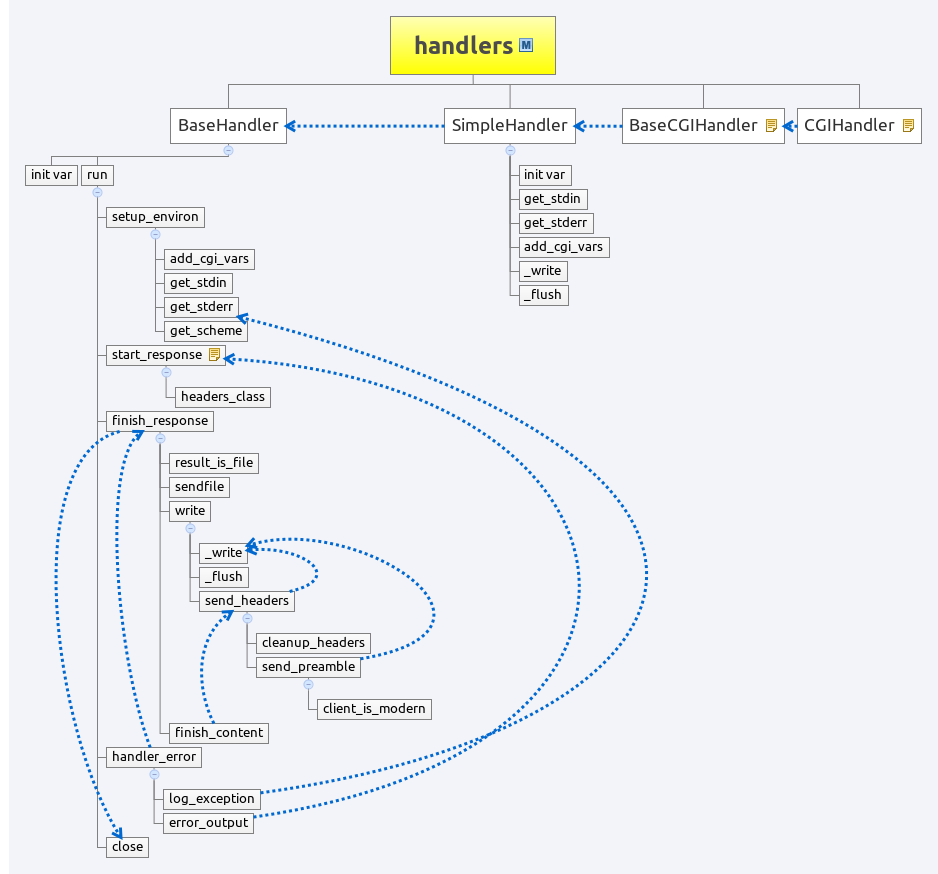
从图中可以看出handler模块中的四部分,它们其实是四个类,从基类到子类依次为:
- BaseHandler
- SimpleHandler
- BaseCGIHandler
- CGIHandler
最主要的实现在 BaseHandler中,其它几个类都是在基类基础上做了简单的实现。BaseHandler是不能直接使用的,因为有几个关键的地方没有实现,SimpleHandler是一个可以使用的简单实现。simple_server中的 ServerHandler类就是这个模块中SimpleHandler的子类。
在 BaseHandler中,最重要的是 run 函数:
def run(self, application):
        """Invoke the application"""
        # Note to self: don't move the close()!  Asynchronous servers shouldn't
        # call close() from finish_response(), so if you close() anywhere but
        # the double-error branch here, you'll break asynchronous servers by
        # prematurely closing.  Async servers must return from 'run()' without
        # closing if there might still be output to iterate over.
        try:
            self.setup_environ()
            self.result = application(self.environ, self.start_response)
            self.finish_response()
        except:
            try:
                self.handle_error()
            except:
                # If we get an error handling an error, just give up already!
                self.close()
                raise   # ...and let the actual server figure it out.
它先设置好环境变量,再调用我们的 demo_app, 并通过 finish_response 将调用结果传送给客户端。如果处理过程遇到错误,转入 handle_error 处理。
此外,BaseHandler中还包含了 WSGI 中多次提到的 start_response,start_response 在 demo_app 中被调用,我们看看它的实现:
    def start_response(self, status, headers,exc_info=None):
        """'start_response()' callable as specified by PEP 333"""

        # M:
        # exc_info:
        #    The exc_info argument, if supplied, must be a Python sys.exc_info()
        #    tuple. This argument should be supplied by the application only if
        #    start_response is being called by an error handler.

        #    exc_info is the most recent exception catch in except clause

        #    in error_output:
        #        start_response(
        #             self.error_status,self.error_headers[:],sys.exc_info())

        # headers_sent:
        #    when send_headers is invoked, headers_sent = True
        #    when close is invoked, headers_sent = False

        if exc_info:
            try:
                if self.headers_sent:
                    # Re-raise original exception if headers sent
                    raise exc_info[0], exc_info[1], exc_info[2]
            finally:
                exc_info = None        # avoid dangling circular ref
        elif self.headers is not None:
            raise AssertionError("Headers already set!")

        assert type(status) is StringType,"Status must be a string"
        assert len(status)>=4,"Status must be at least 4 characters"
        assert int(status[:3]),"Status message must begin w/3-digit code"
        assert status[3]==" ", "Status message must have a space after code"
        if __debug__:
            for name,val in headers:
                assert type(name) is StringType,"Header names must be strings"
                assert type(val) is StringType,"Header values must be strings"
                assert not is_hop_by_hop(name),"Hop-by-hop headers not allowed"

        # M: set status and headers

        self.status = status

        # M:
        #    headers_class is Headers in module headers
        self.headers = self.headers_class(headers)

        return self.write
可以看出,它先对参数进行了检查,然后再将headers 存储在成员变量中,这两点 WSGI标准中都有明确说明,需要检查参数,并且这一步只能将 headers存储起来,不能直接发送给客户端。也就是说,这个 start_response 还没有真正 response。
其实刚刚介绍 run 函数的时候已经提到了,真正的 response 在 finish_response 函数中:
    def finish_response(self):
        """Send any iterable data, then close self and the iterable

        Subclasses intended for use in asynchronous servers will
        want to redefine this method, such that it sets up callbacks
        in the event loop to iterate over the data, and to call
        'self.close()' once the response is finished.
        """

        # M:
        #    result_is_file:
        #       True if 'self.result' is an instance of 'self.wsgi_file_wrapper'
        #    finish_content:
        #       Ensure headers and content have both been sent
        #    close:
        #       Close the iterable (if needed) and reset all instance vars
        if not self.result_is_file() or not self.sendfile():
            for data in self.result:
                self.write(data) # send data by self.write
            self.finish_content()
        self.close()
另外一个需要注意的地方是错误处理,在 run 函数中通过 try/except 捕获错误,错误处理使用了 handle_error 函数,WSGI中提到,start_response 函数的第三个参数 exc_info 会在错误处理的时候使用,我们来看看它是如何被使用的:
    def handle_error(self):
        """Log current error, and send error output to client if possible"""
        self.log_exception(sys.exc_info())
        if not self.headers_sent:
            self.result = self.error_output(self.environ, self.start_response)
            self.finish_response()
        # XXX else: attempt advanced recovery techniques for HTML or text?

    def error_output(self, environ, start_response):
        """WSGI mini-app to create error output

        By default, this just uses the 'error_status', 'error_headers',
        and 'error_body' attributes to generate an output page.  It can
        be overridden in a subclass to dynamically generate diagnostics,
        choose an appropriate message for the user's preferred language, etc.

        Note, however, that it's not recommended from a security perspective to
        spit out diagnostics to any old user; ideally, you should have to do
        something special to enable diagnostic output, which is why we don't
        include any here!
        """

        # M:
        # sys.exc_info():
        #    Return information about the most recent exception caught by an except
        #    clause in the current stack frame or in an older stack frame.

        start_response(self.error_status,self.error_headers[:],sys.exc_info())
        return [self.error_body]
看到了吧,handle_error 又调用了 error_output ,后者调用 start_response,并将其第三个参数设置为 sys.exc_info() ,这一点在 WSGI 中也有说明。
好了,这一部分我们就介绍到这里,不再深入过多的细节,毕竟源代码还是要自己亲自阅读的。剩下的三个部分不是核心问题,就是一些数据结构和工具函数,我们简单说一下。
headers
headers 模块图
这个模块是对HTTP 响应部分的头部设立的数据结构,实现了一个类似Python 中 dict的数据结构。可以看出,它实现了一些函数来支持一些运算符,例如 __len__, __setitem__, __getitem__, __delitem__, __str__, 另外,还实现了 dict 操作中的 get, keys, values函数。
util

这个模块主要就是一些有用的函数,用于处理URL, 环境变量。
validate
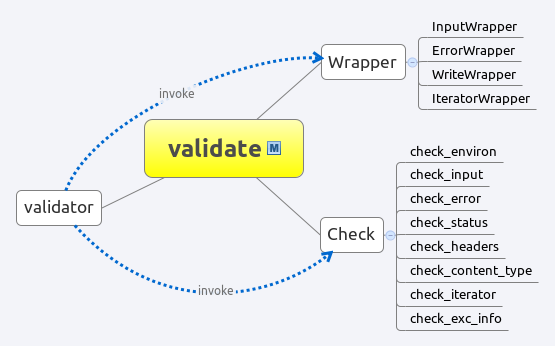
这个模块主要是检查你对WSGI的实现,是否满足标准,包含三个部分:
- validator
- Wrapper
- Check
validator 调用后面两个部分来完成验证工作,可以看出Check部分对WSGI中规定的各个部分进行了检查。
好了,就介绍到这里,这只是一个总结和导读,再次强调:
源代码还是要自己亲自阅读的
